In the field of Art Therapy, using the model of “Art as Therapy” is a process that allows individuals to experience the art making with little direction. This then allows them to gain insight and open up to their feelings in their own time. However, with the population of Autism, I see the “Art as Therapy” model more about the intrinsic sensory processes and believe that it can benefit the child that needs to “just have fun” with the creative activities. Having fun and engaging in this experience can then ultimately regulate the senses, emotions and behaviors.
Let’s explore some techniques and materials that both professionals and parents can use to help their children have this experience. These are some activities that can be adapted for any functioning level by either limiting the amount of materials presented and/or limiting the time allotted

This activity can be a little messy, but often will be a fun way to build a tolerance to wet materials. It is more a “play” activity rather than an art making one, because there is no product at the end. Sometimes the simplest of ingredients can create a great tactile experience- cornstarch and water is a great example of that. Combining these two ingredients makes a fun “goo” that acts like a solid and a liquid at the same time. It’s a great learning activity that will fascinate the kids about how things work.
Making the goo: In a medium size bowl, start with 1 cup of cornstarch and add the water one tablespoon at a time. Stir carefully and add a bit more water or cornstarch as needed to get the right consistency. You’ll know the right consistency when you see it — you won’t quite be able to stir it, but it will still look liquid.
The mixture will act like a solid when you squeeze it or press on it, but when you let it relax; it turns into liquid-like goo. Have the child scrape some up out of the bowl and squeeze it in their hand and watch the material form shapes. Then tell them to relax their hand and watch the shape melt between their fingers and drip back into the bowl. Make a game out of it by seeing how long the shape can stay solid before dripping back to liquid.
This is a project that can be both tactile as well as creative. The senses are engaged, while the goal will be to produce a work of colorful art. The preparation should be done before presenting to the child.
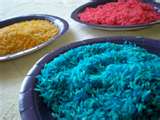
Ingredients: 1 cup dry white rice, 1 teaspoon rubbing alcohol or white vinegar, 3 to 4 drops food coloring, medium size bowl and spoon, and waxed paper or aluminum foil.
Making the Colored Rice: Measure the dry rice into a bowl. Add the rubbing alcohol or vinegar, and stir well to coat. Drop on the food coloring, stirring between each drop. Add food coloring, and keep mixing until the rice is your desired color. Place a sheet of waxed paper or foil on a flat surface. Pour the colored rice onto the waxed paper or aluminum foil. Allow the colored rice to dry completely. This usually takes about 30-60 minutes. Repeat steps to make additional colors of rice.
Making Art with the Colored Rice: To make a mosaic, have the child draw a simple a design onto a piece of cardstock or thin cardboard. Add glue to the design, one area at a time, and then sprinkle on the colored rice. Children with ASD might become over stimulated if given too much rice at once, so it is best to put the rice in small paper cups (bathroom size works well). Also, when applying the glue, give children a small amount with a paintbrush- this helps with the “over squeeze” we often see children engaging in when given the glue container. This activity can be a nice way to teach shapes and colors for younger children by filling simple outlines. For older children, more intricate designs can be incorporated.

By making a musical shaker, children can learn how the tactile elements create sound; allowing them to experiment and feel the items as they are used in fun ways.
Here are some things you can collect to make a variety of shakers: coffee cans, plastic yogurt containers, spice bottles, paper towel rolls. Inside materials: dried peas, popcorn, pennies, dried macaroni, dried beans, and other materials that child may be drawn to. (* this activity should be highly supervised with children who are very oral)
Steps for making shakers: Wash and dry all the empty containers. Have child pick out and choose one to decorate. They can use a variety of art materials to cover the container depending on their age and functioning level. Construction paper is usually a nice way to cover any lettering or labels that have not come off. Offer markers, crayons or glitter glue. Allow the container to dry before filling it.
Experiment with the dried materials by having child reach into the bowl and feel around. Ask child what they think adding that to a shaker would sound like? Let them do this with a few different textures.
When ready, fill each container between one half and two thirds full with the dried beans, macaroni, peas, popcorn seeds or rice. You can mix a couple of the dried ingredients together with some pennies to create different sounds. Attach the lids of the containers, making sure they are tightly sealed. Let them shake, shake, shake, and then you can turn on their favorite songs and let them play to the music.